Part 1: What is Unit Testing?
The main idea behind unit testing is rather than test an entire script or application manually, we automatically test each unit of code that comprises it. In Ruby this frequently means testing each method or each code block. With proper unit testing in place you’ll be able to quickly identify any underlying issues with your code.
Note: Although we’ll be using Ruby and MiniTest for most of this lesson, most of the concepts are universal. There are testing frameworks for Bash too, and while we’re going to start with Ruby, we’ll eventually be writing Bash tests as well.
Setting up MiniTest
There are several options out there, but the testing framework we’re gonna be using for Ruby is called MiniTest.
Run gem install MiniTest
or
put the following in your Gemfile and run bundle install:
gem 'MiniTest', '~> 5.0'
So the first thing we need a script to test. so let’s make one real quick. Save the following as add.rb:
#! /usr/bin/env ruby
def add_things(a,b)
  return a + b
end
Now this method and script may be so simple it’s impractical, but it will help me illustrate a few points, so stay with me.
So we’ve got the script we want to test. Now let’s write our test script. The convention is that you name your test script the name of the script/component you want to test plus _test. So because our script is add.rb we’ll name our test script add_test.rb Fire up your favorite text editor and save the following as add_test.rb:
#! /usr/bin/env ruby
require 'minitest/autorun'
require_relative 'add.rb' #The file containing the code you wish to test

class AddTest < Minitest::Test
end
AddTest is the name of our test suite. It’s where we’ll put all the test statements for the Add component.
Testing basics
Let’s write our first test:
class AddTest < MiniTest::Test
  def test_something
  end
end
All test methods should begin with “test_”
Run the test with ruby add_test.rb You should get something like the following:
# Running:
.
Fabulous run in 0.003111s, 321.4401 runs/s, 0.0000 assertions/s.
You get a dot for each passing test. Of course our test is currently blank, so it’s not very useful as it doesn’t actually test anything. In order for tests to be meaningful they must contain an assertion. An assertion is a way of stating in code what you expect a block of code to do. They are the heart and soul of unit testing. Let’s make our first one.
Edit add_test.rb to look like the following:
#! /usr/bin/env ruby
require 'minitest/autorun'
require_relative 'add.rb'

class AddTest < Minitest::Test
  def test_two_and_two
    assert_equal 4, add_things(2,2)
  end
end
We’ve renamed test_something to be descriptive of what we’re testing and added an assertion. Save and run this and you get something like the following:
# Running:
.
Fabulous run in 0.003111s, 321.4401 runs/s, 0.42542 assertions/s.
1 runs, 1 assertions, 0 failures, 0 errors, 0 skips
Now we have 1 run and 1 assertion; we’re making progress. The dot means that our test passed, but let’s take a look at what happens when a test doesn’t go so well.
Edit the test suite again to add a test that we will know will fail:
class AddTest < Minitest::Test
  def test_two_and_two
    assert_equal 4, add_things(2,2)
  end
  def test_one_and_one
    assert_equal 3, add_things(1,1)
  end
end
Save and run you should get something like the following:
# Running:
F.
Finished in 0.001447s, 1382.1700 runs/s, 1382.1700 assertions/s.
1) Failure:
AddTest#test_one_and_one [add_test.rb:10]:
Expected: 3
Actual: 2
2 runs, 2 assertions, 1 failures, 0 errors, 0 skips
Uh-oh! F stands for failure. However, all is not lost. As you’ll see later, you’ll actually be writing a lot of tests that initially fail. From the output we can learn a lot, including the test name, the line number, the expected result and the actual result, all of which would be very helpful if this was an actual broken method we cared about.
Did you notice something else though:
# Running:
F.
It looks like the failing test (the F) was run before the passing test (the dot), even though it’s the second test in the code; that’s not a mistake. MiniTest randomizes the order it runs your tests on purpose. Each of test should be independant and test one thing and one thing only. If a test will only pass if another test is run first, you really can’t say it’s testing only one thing, so MiniTest randomizes the order to force you to write good, independent tests.
Error and failure are not the same thing
After assertions and failures the next item in the list of results is errors. Let’s fix the second test so that it passes and add a new 3rd test that will error to see what happens when a test errors out.
Edit your test suite:
class AddTest < MiniTest::Test
  def test_two_and_two
    assert_equal 4, add_things(2,2)
  end
  def test_one_and_one
    assert_equal 2, add_things(1,1)
  end
  def test_zero_and_nil
    assert_equal 0, add_things(0,nil)
  end
end
Save and run and you’ll get something like the following:
# Running:
.E.
Finished in 0.001292s, 2321.9814 runs/s, 1547.9876 assertions/s.
1) Error:
AddTest#test_zero_and_nil:
TypeError: nil can't be coerced into Fixnum
/Users/carleton/add.rb:4:in `+'
/Users/carleton/add.rb:4:in `add_things'
add_test.rb:13:in `test_zero_and_nil'
3 runs, 2 assertions, 0 failures, 1 errors, 0 skips
Much like the failed run above, we get some details on what happen. Also rather than breaking the script MiniTest rescues the error and moves on to the other tests.
The last item on list of results is skips. This one is pretty simple. Put the line “skip” at the top of any test method and the test will be skipped. Let’s skip the third, erroring test for the moment:
class AddTest < MiniTest::Test
  def test_two_and_two
    assert_equal 4, add_things(2,2)
  end
  def test_one_and_one
    assert_equal 2, add_things(1,1)
  end
  def test_zero_and_nil
    skip
    assert_equal 0, add_things(0,nil)
  end
end
Run it and you get:
# Running:
.S.
Finished in 0.001535s, 1954.3974 runs/s, 1302.9316 assertions/s.
3 runs, 2 assertions, 0 failures, 0 errors, 1 skips
You have skipped tests. Run with --verbose for details.
As the message states, you can run test scripts with –verbose for added details on each test.
Part 2: Introduction to Test Driven Development(TDD)
The Advantages of Automated Tests
Hopefully at this point the advantages of having test scripts for your code is self-evident:
- Intention: Does the code do what we expect it to? Does it generate the data we expect it to?
- Refactoring/Regression: If we refactor something, does it break any existing code, or introduce any new bugs?
- Purpose: Is it clear what the purpose of each block of code is for?
- Documentation: Test scripts can also serve as ad hoc documentation of the intention and data flow of scripts.
- Finding problems early
- Integration testing
To be clear, automated testing is not a magic bullet, and it won’t fix or find all of the problems with your code. I do believe that over time, it will greatly improve code quality.
Writing Code That Can Be Easily Tested
Okay so hopefully you’re now on board to writing tests with your scripts. To make that process easier you should make it point to write code that can be easily tested. Here’s some guidelines:
1. Wrap most code in methods/functions, and then call them one by one at the end of the script in a run-time block
Unit testing depends on units. You need clearly defined units of code with expected input and output that can be run and re-run. In order to accomplish this you need to wrap almost all of your code in lots of small functions and/or methods and then pass the parameters and results between them. This not only makes for easily testable code, it makes for cleaner, more organized code too.
2. Your scripts can’t fire off immediately when required/sourced
Because MiniTest has to load the target script in memory in order to test it, your script can’t start as soon as it’s required. On the other hand, we’ll always need scripts that start as soon as they’re called directly in Bash/cron. To resolve these two seemingly conflicting requirements, you’ll need to structure your code so that it only fires off when called directly. Fortunately this can be easily accomplished in most languages.
In Ruby:
if __FILE__ == $0
  puts "I'll only be executed if the script is called directly."
end

if __FILE__ != $0
  puts "I'll only be executed if the script is required."
end
The Bash equivalent is:
if [ "$(caller)" = "0 NULL"  ];then
  echo "I'll only get called if you actually call this script rather than source it"
fi
if [ "$(caller)" != "0 NULL"  ];then
 echo "I'll only get called if you source this script"
fi
The Test Driven Development Cycle: Write Your Tests First
With all this in mind, it should be clear that it’s much easier to write tests and code together as you go, rather than write tests for existing code. This approach has been formalized into something called Test Driven Development or TDD.
The following graphic illustrates the basic process:
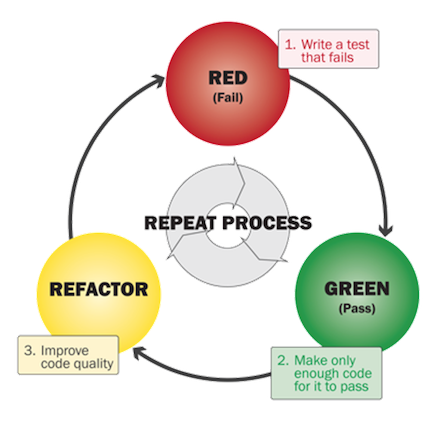
1.Write your tests first
As we saw above, your tests can serve as a kind of outline of the script itself. Before you do any coding, write out your tests. Simply having the tests their will help you organize your code and data flow. Ideally at this stage your tests would all fail (Red)
2. Code only enough to make each test pass
Begin with your first test and code only enough to make it pass with a meaningful assertion. (Green) Coding this way will ensure that you’re staying in scope, and not introducing any unneeded or redundant code.
3) Refactor
Just because your test passes, doesn’t mean that it’s great code yet. Evaluate what you’ve written and see if it can be cleaned up at all.
4. Rinse and Repeat
Re-run your entire test suite and begin working on the next test. As you work you’ll need to make lots of small modifications to your tests and code so that they both do what they’re supposed to do. It may take you some extra time to start, but over time you’ll get the hang of it
Writing Good Tests is Hard
One thing I’ve read over and over when studying up on unit tests is that writing good, helpful unit tests is hard, and takes time. We’ll soon get the hang of it, but here’s some tips:
- Test only one thing at a time
- Make your tests as independent of each other as possible
- Avoid unnecessary assertions, just focus on the key deliverable of each unit
- Consider what external processes and resources we depend on. You may want to write two tests for these: one that tests the connection is valid, one that uses faked data that does not rely on the remote resource.
- Name your tests descriptively, and add detailed comments/descriptions with each one.
More to come
We’re really only scratching the service here. In our next installment we’ll go into some real world examples and look at things like setup and teardown methods.